


Today I take up again the wireless theme to talk to you about BLE_CTF, a project that offers us the customization of an ESP32 module to turn it into an autonomous "Capture the Flag" platform focused on the use of Bluetooth, which will allow us to start getting acquainted with the basics of the interactions between client and Bluetooth LE server.

BLECTF
BLECTF is a creation of Ryan Holeman @hackgnar and is a platform of 20 Low Energy Bluetooth based challenges and in his own words "The purpose of BLE CTF is to teach the basics of low energy Bluetooth client/server interactions. Its purpose is to teach and reinforce the basic concepts that are necessary to dive into the world of Bluetooth hacking". Doesn't sound bad at all, does it?
The concept of this CTF arises around a DIY project, where we must have a basic and cheap hardware, in which we will "flash" the platform after compiling it and that ultimately will offer us in a totally autonomous way 20 Bluetooth challenges that we must solve.
Let's start with it!
The concept of this CTF arises around a DIY project, where we must have a basic and cheap hardware, in which we will "flash" the platform after compiling it and that ultimately will offer us in a totally autonomous way 20 Bluetooth challenges that we must solve.
Let's start with it!
Starting from the beginning! Theoretical Basics of BLE
Bluetooth Low Energy comes in version 4.0 and is a wireless communication protocol that, among other things, allows interactive communication between several devices with minimal resource consumption using the 2.4GHz frequency (like WiFi).
The protocol uses a total of 40 radio channels (with a bandwidth of 2MHz each) of which 3 are used for "advertising" and the other 37 are for data transport and exchange.
The connection requests between the devices and the start of the connection is always through these three Advertisement channels (Channels 37, 38 and 39).
The connection requests between the devices and the start of the connection is always through these three Advertisement channels (Channels 37, 38 and 39).
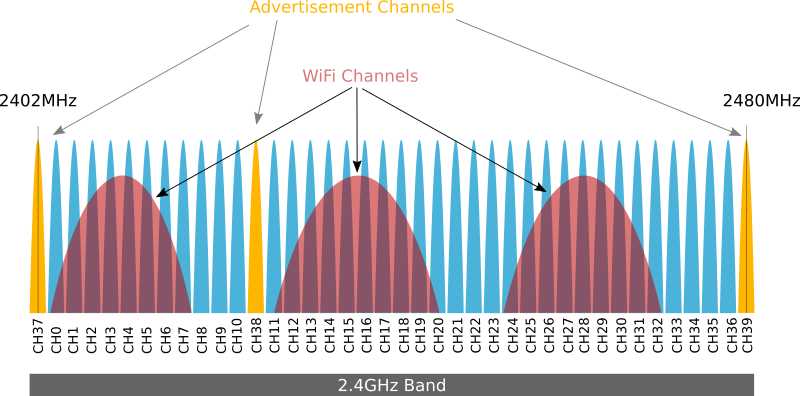
As the use of the 2.4GHz spectrum is used jointly by WiFi, Bluetooth and BLE devices, the protocol establishes a specific operation to avoid possible collisions at that junction. To this end, the protocol determines that the use of the 37 data channels by the devices once the connections have been established is done by jumping between the different channels available for data, the route of which is known by the devices interconnected at that given moment.
Similarly, the protocol defines two key concepts in this mode of use as with the Hop Interval (which determines the milliseconds that will elapse before jumping to another channel) and the Hop Increment (which determines the number of channels that will "jump" and therefore determines the destination channel in the jump). The combination of these two elements gives rise to another new "player" in this game, which is the Channel Map.
Similarly, the protocol defines two key concepts in this mode of use as with the Hop Interval (which determines the milliseconds that will elapse before jumping to another channel) and the Hop Increment (which determines the number of channels that will "jump" and therefore determines the destination channel in the jump). The combination of these two elements gives rise to another new "player" in this game, which is the Channel Map.

GAP y GATT
The Bluetooth protocol stack is divided into two categories: the controller and the host. Each category has subcategories that perform specific functions. The two subcategories we will examine are the Generic Access Profile (GAP) and the Generic Attribute Profile (GATT).
In general terms GAP defines the general topology of the BLE stack while GATT describes how the attributes (data) are transferred once the connection is established.
GATT focuses specifically on how data is formatted, packaged and sent according to the rules described. In the BLE network stack, the Attribute Protocol (ATT) is closely aligned with the GATT, where the GATT is directly above the ATT.

GAP defines several roles for the devices, but for now the only thing we need to be clear about is that we are going to have central devices and peripherals devices.
Peripheral devices are small, "simple", low resource and low consumption devices (glucometer, a pulse meter, temperature and humidity stations, etc...) and can be connected to much more powerful central devices.
Central devices usually correspond to more powerful devices with more memory and processing resources such as mobile phones, tablets, computers, etc..
GATT comes into play when we have already established a connection between two devices (and therefore, after previously going through the GAP) and the most significant thing about the GATT is that the connections are exclusive and this is, in essence, that when a peripheral device is connected to a central device of those exposed in the previous paragraph, this will stop being announced and other devices will no longer be able to see it or connect to it until the existing connection is finished.
Consequently, establishing a connection is also the only way to allow two-way communication in which the central device can send data to the peripheral and vice versa.
GATT define two roles in each connection: client and server. There are some services and features in a predefined standard form that are represented in 16-bit format, but the advantage of BLE is that it allows each manufacturer definir its own services using a 128-bit UUID to adapt this technology to its own applications.
GATT Attributes
GATT servers store information data of different types, organizing it in the form of attributes. An attribute is a piece of tagged and accessible data. Its structure is as follows:

- The Handle attribute is a unique 16-bit identifier that never changes and gives the attribute the quality of accessible.
- The Type attribute (UUID) determines what type of data is stored in the "Value" attribute and uses a 2 or 16-byte universal unique identifier.
- The Value attribute contains the actual value of the data that can be accessed by a client device.
- The Permissions attribute is metadata that determines the ATT access operations allowed for the Value attribute (read, write, or none) and the security requirements (encryption (and required type of encryption) and require authorization).
GATT establishes a hierarchy based on high-level nested objects called: Profiles, Services and Features, which are grouped as follows:

Why did all this boring theory come up and what does it have to do with the CTF? Well, because, as we will see later, the 20 challenges of which the CTF flags are composed are each identified by a handle, and it will be the value that we will have to read, and sometimes modify and send with the hints received to obtain the flags. Don't suffer, I promise you that from now on this post is less heavy and we enter the practical part which is what we all like!
The hardware
BLECTF runs on ESP32 chipset, a SoC (System on Chip) designed by the Chinese company Espressif and originally manufactured by TSMC that integrates in a single chip a 32bits to 160Mhz dual-core Tensilica Xtensa processor (with possibility of up to 240Mhz), WiFi and Bluetooth connectivity.
Somehow among the maker community has always been considered the "big brother" or the evolution of the classic ESP8266 and in fact adds many features and improvements over the ESP8266 such as increased power, Bluetooth 4.0, hardware encryption, temperature sensor, hall sensor, touch sensor, real-time clock (RTC) and more ports.

You can find it for around 10 euros on Amazon if you are the most impatient or around 4 euros if you are not in a hurry to receive it and decide to order it from chinesse supliers.
In addition to the hardware to install and run the CTF we should also keep in mind the hardware we will be using in our computer to carry out the challenges. Although some bluetooth adapters integrated in laptops may be enough for the challenges, depending on the chipset they use we may have problems connecting to the CTF or in certain challenges.
I personally like to have in my "Wireless Arsenal" a totally dedicated device for all my Bluetooth "experimens" and after researching for a while I got it right with a SENA Parani UD-100.

Flashing the software
First of all we will start by installing the necessary pre-requisites in our equipment:
#apt-get install git wget flex bison gperf python python-pip python-setuptools python-serial python-click python-cryptography python-future python-pyparsing python-pyelftools cmake ninja-build ccache
Then we must download the software libraries provided by Espressif in the ESP-IDF repository:
#cd ~/esp
#git clone --recursive https://github.com/espressif/esp-idf.git
In addition to ESP-IDF, it is also necessary to install the tools used by it such as the compiler, debugger, Python packages, etc. And for that we can use the script install.sh included in the package we just downloaded inside the esp-idf folder

We must accompany it with a change in the environment routes so that we do not have problems when compiling the project:

Now we are able to compile and flash our CTF and to do that the first thing is to download it from the creator's GitHub and decompress it in our system. Then we'll run "make menuconfig" which will open a menu of options and where we'll have to perform a very simple action but that personally drove me crazy for hours because without it it's impossible to compile and it's to enable Bluetooth in the framework options!
This configuration can be found in "Component config" and then into "Bluetooth".


This configuration can be found in "Component config" and then into "Bluetooth".
We leave the application (saving the changes before!) and then we can launch the "make" command to carry out the complicated bin file that we will later save in the hardware.
Finally we just have to connect our ESP32 to our computer, make sure the device is recognized and then run "make flash" and watch the flashing of the challenge platform in the ESP32 start. In just a few minutes the device will reboot and will already be announcing itself in the wireless spectrum as a BLE device.

First steps with the CTF
Before starting to fight directly with the flags, there are some things that we must know and "put in place" in a minimally ordered which will provide the ground to concentrate on solving the proposed challenges, is a kind of recognition phase in which one of the first steps will be to identify our local bluetooth device and locate in our nearby the ESP32 running BLECTF.
For both things we will help us from the suite of tools hcitool and we will start by knowing how our system has named our device, using the command hcitool dev the tool shows us all the bluetooth devices that the operating system has recognized, in our case being only one, it has named it as hci0.

The next step will be to try to locate the ESP32 that is running the BLECTF and for that we use again hcitool this time with the option lescan that will sweep the wireles spectrum in search of BLE devices within range, then we will see how a clearly differentiated device appears with the public name BLECTF, we must write down its mac address 30:AE:A4:7B:7E:72 because we will use it a lot from now on.

As the author indicates in his Github, another tool that we need to know and with which it is better that we familiarize ourselves as soon as possible is GATTTOOL, a tool focused on BLE and that will allow us to interact with the GATT services of our CTF hardware unit.
With gatttool we can discover, read and write features the data structure of characteristics and attributes that we read in the boring theory section.

We begin by asking the device for the services offered with the command gatttool -b 30:ae:a4:7b:7e:72 --primary where we will get three results each with its individual UUID defined, and of which only one is not defined by the standard (00001800) and therefore is a personalized one, so it it hosts the CTF.

If we want to see where the 20 CTF challenges are with their respective handles we can use the command gatttool -b 30:ae:a4:7b:7e:72 --characteristics

According to the author himself, there is a command that we are going to use a lot from now on and that will help us to know our score and check, after putting the flags, that they are correct and go up to the score. That score is stored in the handle 0x002a and the command that we suggest the creator is: gatttool -b 30:ae:a4:7b:7e:72 --char-read -a 0x002a|awk -F':' '{print $2}'|tr -d ' '|xxd -r -p;printf '\n'
Due we're going to use it many times and it's not exactly a short command, it's a good idea to put it in a bash file to make it easier to execute.
Due we're going to use it many times and it's not exactly a short command, it's a good idea to put it in a bash file to make it easier to execute.

Just by giving it execution permissions we will have made our lives much easier and it will be enough to execute it to check the score at all times.

In the same way that we have used bash to facilitate the consultation of our score to ESP32, we can repeat the same procedure with the rest of commands that we are going to need in a repetitive way as it is to read the content of the handle.
As this varies with each flag, we will have to configure our executable in bash to pass it as an argument the value of the handle with '-a $1'.


And now we finally have everything in place and ready to start facing the 20 challenges of the platform. Let's get to work!
WRITE-UP
Flag 1
The first flag should be made just by following the indications given by the author himself in his corresponding hint and it is a "gift" for us to become familiar with the way in which we are going to upload the flags to the platform.

Said and done! We follow the instructions and we receive a message indicating that the value has been correctly recorded in that characteristic, we check the score with our bash executable and indeed we have a point corresponding to that first flag!

What we learn with this first flag is that we're going to have to put the values in the read/write handle 0x002c, so maybe it's not bad idea to make our life easier again and create another executable file in bash that memorizes for us the whole command and whose value of the flag we pass to it as an argument to use it from now on. It's important to respect xxd so that you save it in hex format.

Flag 0x002e
In this flag they ask us to read the handle 0x002e and the resulting value is the one we will put as a flag in the handle 0x002c. Let's work: we start by reading the handle to get its value.
Now we proceed to use our file created in the previous challenge to send the flag and then consult the score in the same way and see if we have one more point and therefore the flag was correct.

Flag 0x0030
We start by reading the 0x0030 handle and it tells us that the flag consists of the MD5 of the device name.

We will find out the necessary value using "echo -n BLECTF | md5sum" and then send those first 20 characters with our executable file and when checking the punctuation we notice that we already have one more point for us!

IMPORTANT: in all the flags, the string that we must pass as an argument will be limited to the first 20 characters. You can implement a function in the executable to truncate the string to those first 20 characters).
Flag 0x0016
The hint of this flag invites us to find the value of [Generic Access - Device Name]. To do so, we will start an interactive session with ESP32 using gatttool.
We start by opening an interactive session and connecting to the device with the command "gatttool -b 30:AE:A4:7B:7E:72 -I" and then using the command "connect".

According to the BLE standard, the UUID that must store the name of the device is 00002a00, so we must ask ESP32 the characteristics of the services offered until we locate that UUID, we will find it inside the handle 0x0016:

We take advantage of the interactive session connected to the device to read the value of the handle and we will obtain the value in hexadecimal format.

We can forward the flag in hexadecimal format by truncating the string to the first 20 characters as we already know and using gatttool, or we can convert the string even if it is more time consuming if we want to use our executable file to forward the flag afterwards.

Now we only have to put the flag and check the score to see how another point has risen on the scoreboard in our favor.

Flag 0x0032
We start by reading the 0x0032 handle and notice that it asks us to overwrite it with literally anything.

Let's write for example the string "Hacker De Cabecera" with gatttool, once done we read the handle again and observe how it has indeed already changed because of what we have just written.

We submit the flag and check the score: another one bites the dust!

Flag 0x0034
The hint of this flag invites us to do the same as in the previous one: rewrite a handle with a specific ASCII chain, in this case it should be "me".

We repeat the process of the previous flag and write the string indicated in the 0x0034 handle and then insert our flag.

Flag 0x0036
For this flag again we are asked to write on a handle, but this time we are asked to be specifically the hex value 0x07. We'll use gatttol and the --char-write-req option again, just like the previous flags.

Again, all we have to do is put the flag in and make sure it's right.

Flag 0x0038
This time the handle asks us to write in a handle different from itself and asks us to rewrite the specific value 0xC9.

We proceed in the same way as in the previous flags and rewrite handle 0x0058 and when we read handle 0x0038 again we notice that it has already changed.
We only have to put the flag and check that the point has gone up in our score.

Flag 0x003c
Here it gets interesting and challenges us to make him brute-force from the hex value 00 to the hex value ff.

Speaking in decimal, it asks us to make a brute force between the decimal value 0 and the decimal value 255.

Once it's finished, we read again the 0x003c handle and observe that its value has already changed, so we proceed to put the flag and add another point.

Flag 0x003e
Another interesting challenge!! This time the handle asks us to read it... no more and no less than 1000 times!!

Since using the up cursor and pressing the enter for 999 more times doesn't sound entirely interesting... we'd better make another bash loop that launches for 1000 times our executable file to read the handle.

After a while running our loop, we will see how the value has changed from "Read me 1000 times" to "6ffcd214ffebdc0d069e".

We register the flag and check the score to consider this challenge passed.

Flag 0x0040
When reading the handle, what it asks us on this occasion is to keep listening to it while waiting for some notification.

To overcome this, we are going to record the value 0100 with gatttool together with the option --listen to stay on listening (the values to keep on listening correspond to 0100 for notifications, 0200 for indications, 0300 for both).
After only a few seconds we will get the necessary notification.
After only a few seconds we will get the necessary notification.

All we have to do now is to remit the flag and check the score: we have already overcome half the challenges!!!

Flag 0x0042
This time when reading the handle what it tells us is that we should listen handle 0x0044 for a "indication".

As we have seen in the previous challenge, with the --listen option we can use values of 0100 for notifications, 0200 for indications and 0300 for both, as it explicitly indicates us that we will listen to an indication we will use the value 0200 in this occasion.
After only a few seconds we will get the necessary notification.
After only a few seconds we will get the necessary notification.

All that remains is to send the flag and check the score.

Flag 0x0046
We read the handle and observe that it asks us exactly the same as in the previous flag but this time it talks about several notifications.

We repeat the same command as in the previous flag and we receive a first notification different from the second and consecutive ones.

We convert them and clearly see how the first one we can discard it directly (U no want this msg) and the second one is the one that looks best for our purpose.

Try our luck with that second notice and: voilá! We got it!

Flag 0x0048
This handle is a bit strange... because basically it's asking us the same thing as in the previous challenge, only this time it asks us to listen to the multiple notifications in a different handle than itself.

We repeat therefore all the steps that in the previous challenge but this time on the flag 0x004a and we will end up arriving at the necessary flag and uploading it to the scoreboard in the same way.


Flag 0x004c
This challenge told us that to obtain the flag we must interact with this handle with a certain MAC address in our adapter, specifically 11:22:33:44:55:66.
To spoof the MAC address of our adapter (WARNING! Not all Bluetooth adapters will allow you to do this) we will use the spooftooph tool indicating our interface and the new MAC we want to obtain.

We can make sure that the exchange is effective and correct with hcitool dev.
Once we have the MAC address that we have indicated in our adapter, we read again the characteristics of the handle and we proceed to put the flag with the result that returns to us in order to raise another point to our marker.

Flag 0x004e
In this handle we are invited to play with the MTU value (Maximum Transfer Unit, which expresses the size in bytes of the largest data unit that can be sent using a communications protocol).

For this we are going to connect through gatttool with an interactive session to the device and once connected we are going to use the mtu command to assign it a value of 44 as requested and then we read again the handle 0x004e and obtain the hexadecimal string.

We send the flag and... we're already much closer to the goal!

Flag 0x0050
This handle asks us to write "hello" but seems to indicate that we should also expect a response.

To get it right, instead of using the --char-write modifier, which only writes but doesn't expect a response, we should use --char-write-req, which still makes a write request but in addition remains expecting a response from the server.
After doing this we read the handle again and notice that it has already changed.

We send the flag and we have it. We only have three challenges left!!!

Flag 0x0052
Leyendo este handle obtenemos un misterioso mensaje en el que afirma que no hay notificaciones en él, pero con un "really" que suena sospechoso...

Si hacemos caso omiso y repetimos el procedimiento de flags anteriores en el que vamos a permanecer a la escucha de notificaciones y... tenemos suerte! Recibimos una notificación!

Metemos la flag con ese valor recibido y hay suerte! una más!

Flag 0x0054
This handle tells us that there "are so many properties"!

Basically, what it comes to indicate is that the complete flag is separated into two parts and we have to reconstruct it using two techniques that we have already seen in previous challenges: first we will write it with a high value, we will read it and we will have half a flag. For the second half, we launch a request and we capture the second half of the flag in notification mode.

Flag 0x0056
The last challenge is not difficult, but it is a good end to the CTF: reading the handle we see that it asks for the MD5 of the creator's Twitter.

The necessary thing to do is to repeat the same process that in one of the first challenges that if you remember we were asked for the MD5 of the name of the device, but this time with the Twitter of the creator that is @hackgnar so let's do it.

And now all we have to do is try luck and put the flag in, check the score and see if we have finally finished the CTF!!

And that's all for now! We have finished the CTF! Congratulations if you have followed it and reached the goal, but above all for the merit that you have read up untill this paragraph!
I'm sorry that in the end there was such a long post and I'm sorry for having put all that theory at the beginning, but if there was something that has helped me personally this project beyond "playing the CTF" has been to force me to document about Bluetooth and BLE and, although of course I still have a world to learn about it, I considered necessary and interesting to present some of the foundations with which later we were going to interact more or less along the challenges.
I hope you enjoyed it and that it was useful to you, if you decide to do the project and experiment with it and you have any doubt/question in which I can help you, don't hesitate to contact me!
Regards!!!
Regards!!!


0 comentarios:
Publicar un comentario